


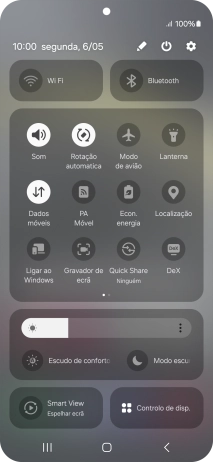
1. Procure "Gestor SIM"
Deslize dois dedos sobre o ecrã de cima para baixo a partir do topo do ecrã.


1. Procure "Gestor SIM"
Prima o ícone de definições.


1. Procure "Gestor SIM"
Prima Ligações.


1. Procure "Gestor SIM"
Prima Gestor SIM.


2. Ative ou desative o uso do plano
Prima o eSIM pretendido.


2. Ative ou desative o uso do plano
Prima o indicador para ativar ou desativar a utilização do plano.


2. Ative ou desative o uso do plano
Se desativar a utilização do plano, deve premir Desligar.


2. Ative ou desative o uso do plano
Se ativar a utilização do plano, deve premir Ligar.
2. Ative ou desative o uso do plano
Prima a tecla de retrocesso.
3. Selecione o plano predefinido para chamadas de voz
Prima Chamadas.


3. Selecione o plano predefinido para chamadas de voz
Prima a definição pretendida.
4. Selecione o plano predefinido para mensagens curtas
Prima Mensagens.


4. Selecione o plano predefinido para mensagens curtas
Prima o plano pretendido.
5. Selecione o plano predefinido para dados móveis
Prima Dados móveis.


5. Selecione o plano predefinido para dados móveis
Prima a definição pretendida.
6. Ative ou desative a seleção automática do plano para dados móveis
Prima o indicador junto a "Mudança de dados e chamadas de reserva" para ativar ou desativar a função.
7. Volte ao ecrã inicial
Prima a tecla de início para terminar e voltar ao ecrã inicial.
1. Procure "Gestor SIM"


2. Ative ou desative o uso do plano


3. Selecione o plano predefinido para chamadas de voz

4. Selecione o plano predefinido para mensagens curtas

5. Selecione o plano predefinido para dados móveis

6. Ative ou desative a seleção automática do plano para dados móveis
7. Volte ao ecrã inicial