


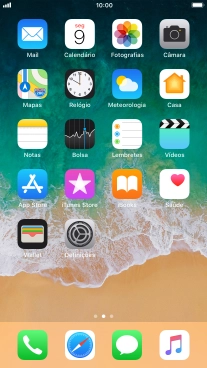
1. Procure "Contas e palavras-passe"
Prima Definições.


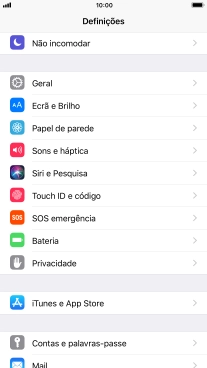
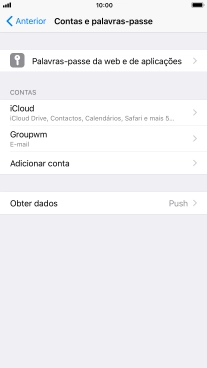
1. Procure "Contas e palavras-passe"
Prima Contas e palavras-passe.


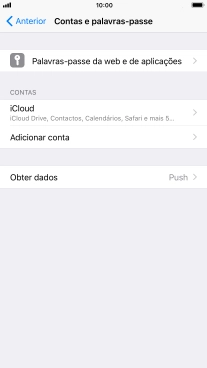
2. Crie uma nova conta de e-mail
Prima Adicionar conta.


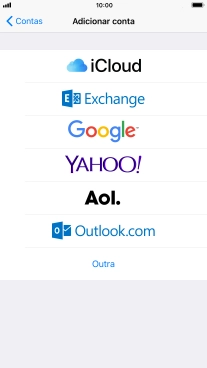
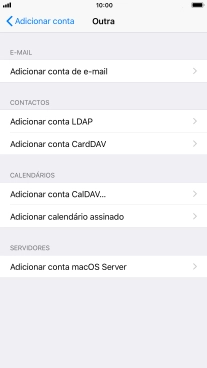
2. Crie uma nova conta de e-mail
Prima Outra.


2. Crie uma nova conta de e-mail
Prima Adicionar conta de e-mail.


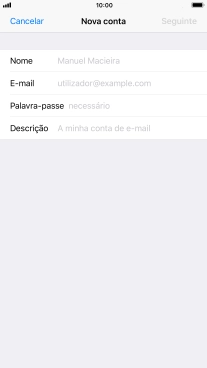
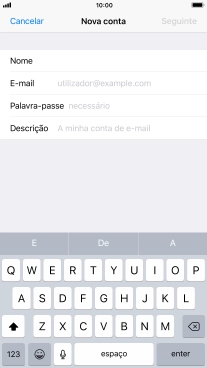
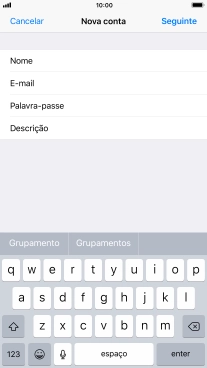
3. Introduza o nome do remetente
Prima Nome e introduza o nome do remetente pretendido.


4. Introduza o endereço de e-mail
Prima E-mail e introduza o seu endereço de e-mail Vodafone.


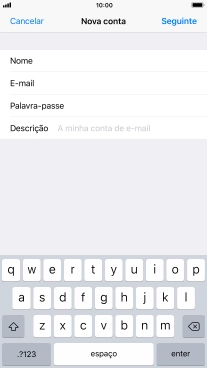
5. Introduza a password
Prima Palavra-passe e introduza a password da sua conta de e-mail na Vodafone.


6. Introduza o nome da conta de e-mail
Prima Descrição e introduza o nome pretendido da conta de e-mail.


6. Introduza o nome da conta de e-mail
Prima Seguinte.


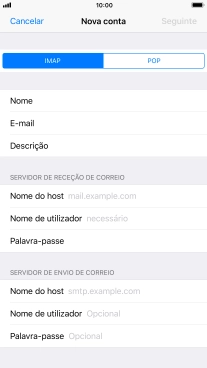
7. Escolha o tipo de servidor
Prima POP.


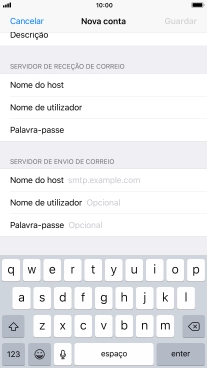
8. Introduza o servidor de receção
Prima Nome do host e insira pop.vodafone.pt.


9. Introduza o nome de utilizador
Prima Nome de utilizador e introduza o nome de utilizador da sua conta de e-mail na Vodafone.


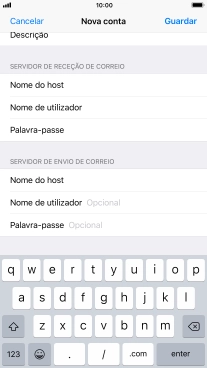
10. Introduza o servidor de envio
Prima Nome do host e insira smtp.vodafone.pt.


11. Introduza o nome de utilizador
Prima Nome de utilizador e introduza o nome de utilizador da sua conta de e-mail na Vodafone.


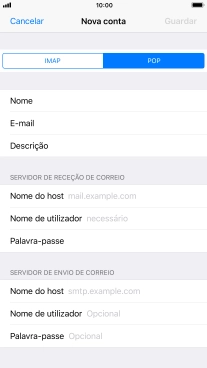
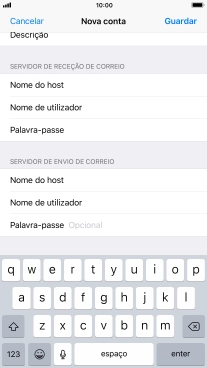
12. Introduza a password
Prima Palavra-passe e introduza a password da sua conta de e-mail na Vodafone.


12. Introduza a password
Prima Guardar. A sua conta de e-mail está agora configurada. Se pretender escolher definições adicionais para o servidor de receção e envio, siga os passos seguintes.


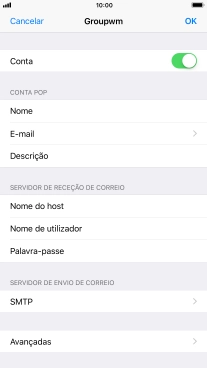
13. Escolha uma conta de e-mail
Prima o nome na conta de e-mail que acabou de criar.


14. Ative a encriptação no envio de e-mails
Prima SMTP.


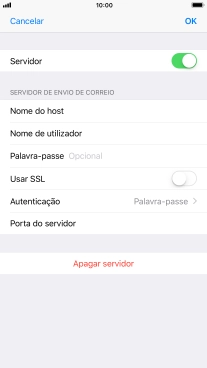
14. Ative a encriptação no envio de e-mails
Prima o campo sob "SERVIDOR PRINCIPAL".


14. Ative a encriptação no envio de e-mails
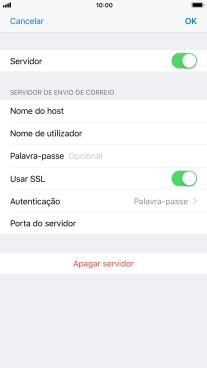
Prima o indicador junto a "Usar SSL" para ativar a função.


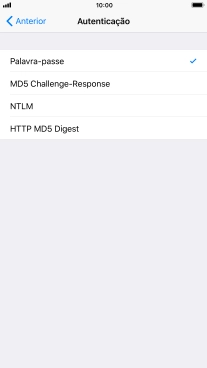
15. Desative a encriptação da password
Prima Autenticação.


15. Desative a encriptação da password
Prima Palavra-passe.
15. Desative a encriptação da password
Prima a seta para a esquerda.
16. Introduza o número da porta de envio
Prima Porta do servidor e insira 587.
16. Introduza o número da porta de envio
Prima OK.
16. Introduza o número da porta de envio
Prima a seta para a esquerda.
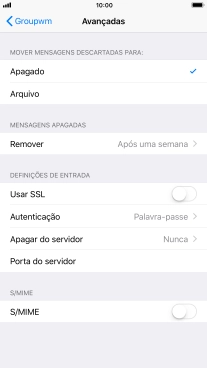
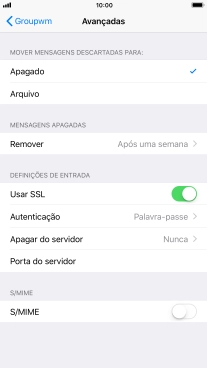
17. Ative a encriptação na receção de e-mails
Prima Avançadas.


17. Ative a encriptação na receção de e-mails
Prima o indicador junto a "Usar SSL" para ativar a função.


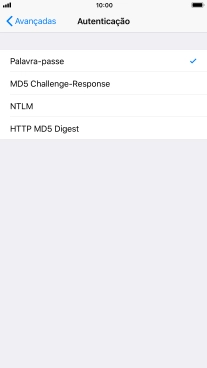
18. Desative a encriptação da password
Prima Autenticação.


18. Desative a encriptação da password
Prima Palavra-passe.
18. Desative a encriptação da password
Prima a seta para a esquerda.
19. Introduza o número da porta de receção
Prima Porta do servidor e insira 995.
19. Introduza o número da porta de receção
Prima a seta para a esquerda.
19. Introduza o número da porta de receção
Prima OK.
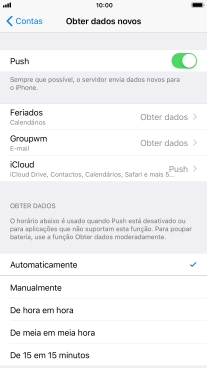
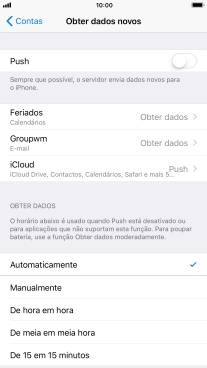
20. Escolha a definição de verificação de novos e-mails
Prima Obter dados.


20. Escolha a definição de verificação de novos e-mails
Prima o indicador junto a "Push" para ativar ou desativar a função.


20. Escolha a definição de verificação de novos e-mails
Se desativar a função, prima a definição pretendida.
20. Escolha a definição de verificação de novos e-mails
Prima a conta de e-mail pretendida e siga as indicações no ecrã para escolher as definições para a conta respetiva.
21. Volte ao ecrã inicial
Prima a tecla de início para terminar e voltar ao ecrã inicial.
1. Procure "Contas e palavras-passe"
2. Crie uma nova conta de e-mail
3. Introduza o nome do remetente
4. Introduza o endereço de e-mail
5. Introduza a password

6. Introduza o nome da conta de e-mail
7. Escolha o tipo de servidor
8. Introduza o servidor de receção
9. Introduza o nome de utilizador
10. Introduza o servidor de envio
11. Introduza o nome de utilizador
12. Introduza a password
13. Escolha uma conta de e-mail
14. Ative a encriptação no envio de e-mails

15. Desative a encriptação da password
16. Introduza o número da porta de envio
17. Ative a encriptação na receção de e-mails
18. Desative a encriptação da password
19. Introduza o número da porta de receção
20. Escolha a definição de verificação de novos e-mails
21. Volte ao ecrã inicial